
Address Book Segmentation in Exchange Server
Many companies still use Exchange Server as their email communication solution. Typically, Exchange Server is used for internal purposes, i.e., for a single company.
However, there are also hosting providers that centrally provide Exchange Server for several companies in parallel. This can be interesting for companies that do not want to switch to Exchange Online or, for example, want to use a regional provider for better accessibility.
Exchange Server as a multi-tenant system?
Of course, it would be possible to operate a separate Exchange infrastructure for each of these companies. However, this approach quickly becomes expensive and inefficient. Instead, it makes sense to set up a central organization and equip it with sufficient performance and availability. However, it must then be ensured that no data protection violations can occur – for example, because the employees of the organizations can “see” each other.
Those familiar with Exchange Server may now be wondering: how does that work? At least in the graphical user interface, there are no functions for separating users from each other. The answer (as so often) is: PowerShell!
This can be set up with a few changes in Active Directory and a few PowerShell commands. Let's take a look behind the scenes and see how to prevent employees from seeing each other in the global address list – with address book segmentation.
The address book segmentation
By default, Exchange Server provides a so-called Global Address List (GAL). This list is automatically populated with all mailboxes that exist in the Exchange organization. However, this is not desirable in a multi-tenant organization. Therefore, separate lists must be created for each customer, containing only members of their own company.
Adjusting the default permissions for address lists
First, however, access to the default address lists must be blocked. The necessary steps for this must be performed in the Active Directory Services Interfaces (ADSI) console:
- Start ADSI Editor from the list of administrative tools (e.g., enter “ADSI” as a search term in the Start menu).
- Right-click on “ADSI Editor” in the console and select “Connect.”
- From the “Select a known naming context:” list, select the ‘Configuration’ option and confirm with “OK.”
- Navigate to “CN=Services,CN=Microsoft Exchange,CN=,CN=Address Lists Container.”
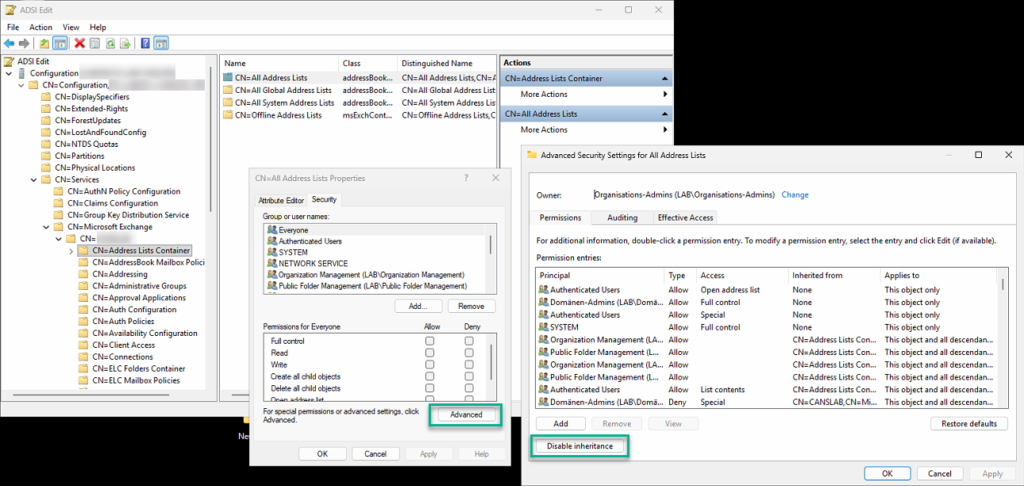
- Right-click on “CN=All Address Lists” and select “Properties.”
- Switch to the “Security” tab and click “Advanced.”
- At the bottom, click the “Disable inheritance” option and select the “Inherit permissions from parent…” option.
- Remove the permission for the “Authenticated Users” principal.
- Repeat these steps for additional address lists.
This ensures that users cannot accidentally open address lists containing all mailboxes. The window can remain open, as permissions for individual address lists will need to be configured later.
Creation of Active Directory groups per tenant
Before the individual address lists are created for each client, groups must first be created. These groups are used to authorize the user accounts of each client for the respective individual address lists. Pure Active Directory security groups are generally sufficient for this purpose. However, in order to better assign the function, it may be useful to activate these groups in Exchange Server for email. In this case, however, the groups must be hidden from all address lists.
In an environment with a shared security model, this requires a two-step procedure—otherwise, the group can also be created directly in the Exchange Admin Center or using the Exchange Management Shell:
- Create the Active Directory security group
- Enable email distribution with Exchange Management Shell
# Create new Active Directory security group - needs the PowerShell module ActiveDirectory
New-ADGroup -Name <group name> -GroupScope Universal -GroupCategory Security

# Enable group for email in Exchange Server - needs the Exchange Management Shell
Enable-DistributionGroup -Identity <group name>Creation of address lists per tenant
Next, the default address lists must be rebuilt individually for each tenant. This requires the Exchange Management Shell, in which the following commands must be executed. Please note the following:
- This example uses a certain naming syntax (e.g., GAL-, ADR-, etc.) which can be adapted to your own requirements.
- In this example, organizational units and groups are used as criteria for populating the address lists. These must be specified in DistinguishedName format, e.g., "CN=All Employees CONTOSO,OU=Groups,DC=CONTOSO,DC=COM". Exchange Server also offers a variety of other options for automatic mapping, such as attributes. See Filterable properties for the RecipientFilter parameter | Microsoft Learn
# Create new Global Address List
New-GlobalAddressList -Name 'GAL-<Tenant>' -RecipientFilter 'MemberOfGroup -eq <DistinguishedName of Active Directory group>' -RecipientContainer '<DistinguishedName of Active Directory organizational unit>'

# Create address list for all user mailboxes
New-Addresslist -Name 'ADR-<Tenant>-Users' -IncludedRecipients UserMailboxes -RecipientContainer '<DistinguishedName of Active Directory organizational unit>'

# Create address list for all room mailboxes
New-Addresslist -Name 'ADR-<Tenant>-Rooms' -IncludedRecipients Resources -RecipientContainer '<DistinguishedName of Active Directory organizational unit>'

# Create offline address book
New-OfflineAddressBook -Name 'OAB-<Tenant>' -AddressLists 'ADR-<Tenant>-Users'

# Create address book policy
New-AddressBookPolicy -Name 'ABP-<Tenant>' -AddressLists 'ADR-<Tenant>-Users' -RoomList 'ADR-<Tenant>-Rooms' -GlobalAddressList 'GAL-<Tenant>' -OfflineAddressBook 'OAB-<Tenant>'Setting up permissions on address lists
After creating the lists, the previously created security group must be authorized to access the new address lists. This grants the respective users access to the address lists and the offline address book for their own company.
If the ADSI console is still open, the "Security" tab must be accessed in the address list properties. The new group must be added here. The "Read" and "Open Address List" permissions must be assigned to this group.
Assigning the address book policy to mailboxes
As a final step, the new address book policy must be assigned to the mailboxes. This ensures that users only have access to their own company's address lists and offline address book. This step can be performed via the Exchange Admin Center, but for larger numbers of users, it is better to do this via PowerShell.
# Get all mailboxes for the tenant based on the primary email address
$Mailboxes = Get-Mailbox -Filter 'PrimarySmtpAddress -like "<part of the primary email address, i.e., *@microwsoft.de"'

# Assign new address book policy to all mailboxes
ForEach ($Mailbox in $Mailbox){Set-Mailbox $Mailbox.Name -AddressBookPolicy 'ABP-<Tenant>'After that, users should only be able to see mailboxes from their own company in their email app.
Important: this only affects the view. Users can still send emails to each other without any problems if they enter the full email address. If you want to prevent this too, you'll need to create a transport rule for it.
Address book segmentation in Exchange Online
Address book segmentation can also be set up in Exchange Online. However, in this case, it is not used to separate entire companies, but rather individual areas within a company. This is also due to the fact that Exchange Online is already a multi-tenant system per se, and the inclusion of multiple companies in a shared tenant is therefore only permitted under very specific conditions.
Address book segmentation is therefore used here as part of the information barriers that also allow separation for Teams, SharePoint Online, and OneDrive for Business. There is a separate blog post on this topic, which you can find here: Separation of business units in Microsoft 365 - with Information Barriers!
Liked this article? Share it!