
Hierarchies for Exchange Address Lists - why and how does it work?
It is common practice to map the organizational structure of your own company in IT services. While this is not recommended in Active Directory (companies tend to restructure every few years, and this is usually not easy to implement in AD), services for Exchange Online and Teams are more suitable for this purpose. This is because the settings there can be designed dynamically and thus automatically adapt to new structures.
One example of this is address lists, which can be used in both Exchange Server/Online and Teams. Similar to phone books, address lists can be used to logically group users/mailboxes in a common overview – e.g., by function, business unit, location, etc. Normally, address lists are created flat, i.e., on the same level. This simply results in a (long) list with different address lists.
However, address lists can also build on each other and thus, for example, be modeled on the organizational structure of the company. There are several ways to do this, which this article highlights.
Did you know? Microsoft uses the terms “address book” and “address list” interchangeably. Even though both terms appear repeatedly in articles and instructions, they refer to the same function.
The container variant
In the so-called container variant, address lists are simply grouped together when they are created. When creating the list, only the path (= container) of the parent address list needs to be entered, with the top level marked with a “\”. This could look like this, for example:
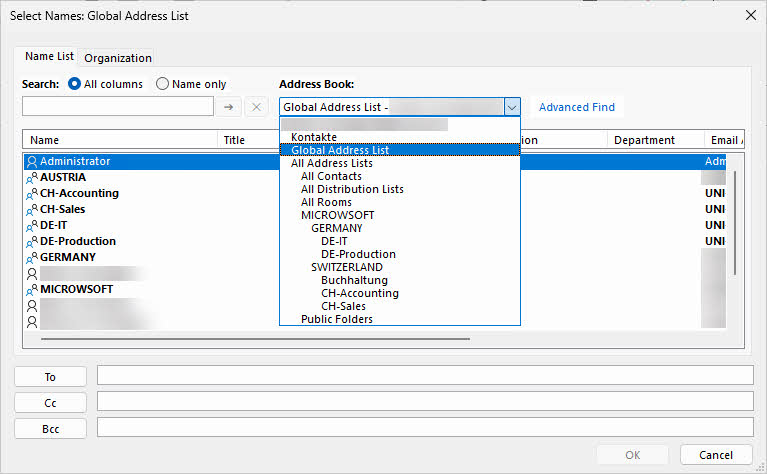
- \MICROWSOFT
- \GERMANY
- \DE-IT
- \DE-Production
- SWITZERLAND
- \CH-Accounting
- \CH-Sales
- \GERMANY
The path to the “Accounting” address list would therefore be: \COMPANY\LOCATION2\Accounting.
This variant is created either via the Exchange Management Shell (PowerShell) or via the Exchange Admin Center. In Exchange Online, only the Exchange Online Management Shell is available. In addition, a special role group must first be created and assigned the necessary permissions (Address Lists).
The distribution group variant
Exchange Server and Exchange Online also offer a variant based on nesting distribution groups. There is even a specific term for this: hierarchical address books (HAB).
Accordingly, distribution groups must be created in accordance with the organizational structure and assigned to each other as members. This procedure is used in accordance with best practices in role and rights concepts and is therefore a common procedure.
The organizational structure is then automatically mapped according to the group nesting. This can look like the following example:
The group names follow a uniform naming syntax for all objects and reflect the configuration of the group (universal distribution group).
UNI = Universal
DIS = DistributionTo make it easier for users to assign groups, a different display name can be selected (indicated in parentheses after the group name).
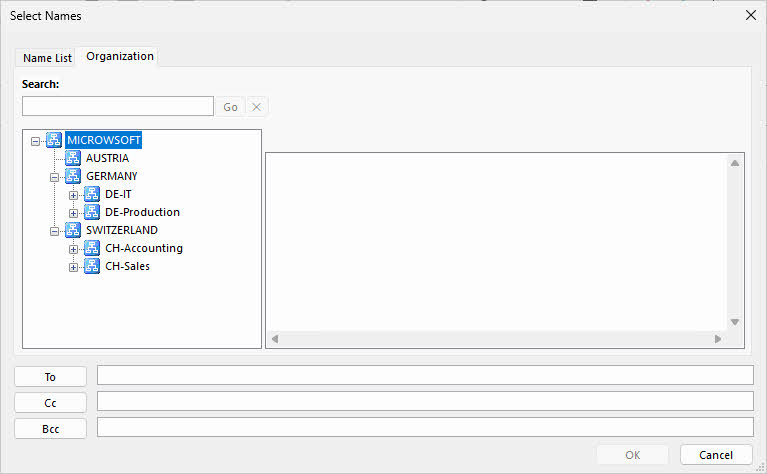
- UNI-DIS-MICROWSOFT-ROOT (MICROWSOFT)
- UNI-DIS-MICROWSOFT-GERMANY (GERMANY)
- UNI-DIS-MICROWSOFT-GERMANY-IT (DE-IT)
- UNI-DIS-MICROWSOFT-GERMANY-Production (DE-Production)
- UNI-DIS-MICROWSOFT-SWITZERLAND (SWITZERLAND)
- UNI-DIS-MICROWSOFT-SWITZERLAND-Accounting (CH-Accounting)
- UNI-DIS-MICROWSOFT-SWITZERLAND-Sales (CH-Sales)
- UNI-DIS-MICROWSOFT-AUSTRIA (AUSTRIA)
- UNI-DIS-MICROWSOFT-GERMANY (GERMANY)
This variant can only be created and managed via the Exchange (Online) Management Shell (PowerShell).
Comparison of the two variants
| Criterion | Container-based | Hierarchical Address Books |
|---|---|---|
| Location for creating address lists | Exchange Server/Online | When using the split permissions model, a two-step process is used (Active Directory + Exchange Server/Online). |
| Available options for creation | Exchange Admin Center (Exchange Server only) Exchange (Online) Management Shell (Exchange Server/Online) | Exchange (Online) Management Shell only |
| Sorting of address lists | Automatically, alphabetically | Automatic, but arbitrary; can be individually configured via PowerShell (even down to the mailbox level) |
| Availability | Outlook (classic + new), OWA | Outlook (classic) |
| Special considerations | - | Distribution groups cannot be hidden from GAL and are therefore also available in the GAL view. |
| Synchronization to Exchange Online | No (they must be transferred separately via script, as must any adjustments) | Partially (groups can be synchronized, HABs must be set up and maintained separately) |
HABs (Address Lists) appear outdated in comparison. While they allow for granular configuration, they are more complex to set up and, moreover, cannot be used across multiple apps. For these reasons, traditional address lists are preferable.
Configuration
Container variant
The following describes the method using PowerShell, as this approach works in both Exchange Server and Exchange Online. Important: In Exchange Online, a role group with the necessary permissions must first be created (instructions for this are available in this article). Even the Exchange Administrator role does not have this right by default!
The following code demonstrates how to create the address lists mentioned above:
# Create address lists that build upon each other
New-AddressList -Name 'MICROWSOFT' -Container '\' -IncludedRecipients AllRecipients -ConditionalCompany 'MicrowSoft' -DisplayName 'MICROWSOFT'
New-AddressList -Name 'GERMANY' -Container '\MICROWSOFT' -IncludedRecipients AllRecipients -ConditionalCompany 'MicrowSoft' -RecipientContainer 'OU=GERMANY,OU=MICROWSOFT,DC=MICROWSOFT,DC=DE' -DisplayName 'GERMANY'
New-AddressList -Name 'DE-IT' -Container '\MICROWSOFT\GERMANY' -IncludedRecipients AllRecipients -ConditionalCompany 'MicrowSoft' -ConditionalDepartment 'IT' -DisplayName 'DE-IT'
New-AddressList -Name 'DE-Production' -Container '\MICROWSOFT\GERMANY' -IncludedRecipients AllRecipients -ConditionalCompany 'MicrowSoft' -ConditionalDepartment 'Production' -DisplayName 'DE-Production'
New-AddressList -Name 'SWITZERLAND' -Container '\MICROWSOFT' -IncludedRecipients AllRecipients -ConditionalCompany 'MicrowSoft' -RecipientContainer 'OU=SWITZERLAND,OU=MICROWSOFT,DC=MICROWSOFT,DC=DE' -DisplayName 'SWITZERLAND'
New-AddressList -Name 'CH-Accounting' -Container '\MICROWSOFT\SWITZERLAND' -IncludedRecipients AllRecipients -ConditionalCompany 'MicrowSoft' -ConditionalDepartment 'Accounting' -DisplayName 'CH-Accounting'
New-AddressList -Name 'CH-Sales' -Container '\MICROWSOFT\SWITZERLAND' -IncludedRecipients AllRecipients -ConditionalCompany 'MicrowSoft' -ConditionalDepartment 'Sales' -DisplayName 'CH-Sales'Group variant
HABs can only be created and managed via PowerShell. The following code demonstrates how to create the structure mentioned above:
# Create distribution groups
# A1 - EXCHANGE SERVER ONLY - In the split permissions model, universal distribution groups must first be created.
New-ADGroup -Name 'UNI-DIS-MICROWSOFT-ROOT' -GroupType Distribution -GroupScope Universal
New-ADGroup -Name 'UNI-DIS-MICROWSOFT-GERMANY' -GroupType Distribution -GroupScope Universal
New-ADGroup -Name 'UNI-DIS-MICROWSOFT-GERMANY-IT' -GroupType Distribution -GroupScope Universal
New-ADGroup -Name 'UNI-DIS-MICROWSOFT-GERMANY-Production' -GroupType Distribution -GroupScope Universal
New-ADGroup -Name 'UNI-DIS-MICROWSOFT-AUSTRIA' -GroupType Distribution -GroupScope Universal
New-ADGroup -Name 'UNI-DIS-MICROWSOFT-SWITZERLAND' -GroupType Distribution -GroupScope Universal
New-ADGroup -Name 'UNI-DIS-MICROWSOFT-SWITZERLAND-Accounting' -GroupType Distribution -GroupScope Universal
New-ADGroup -Name 'UNI-DIS-MICROWSOFT-SWITZERLAND-Sales' -GroupType Distribution -GroupScope Universal

# A2 - EXCHANGE SERVER ONLY - Nesting of groups
Add-ADGroupMember -Identity 'UNI-DIS-MICROWSOFT-ROOT' -Members 'UNI-DIS-MICROWSOFT-GERMANY','UNI-DIS-MICROWSOFT-AUSTRIA','UNI-DIS-MICROWSOFT-SWITZERLAND'
Add-ADGroupMember -Identity 'UNI-DIS-MICROWSOFT-GERMANY' -Members 'UNI-DIS-MICROWSOFT-GERMANY-IT','UNI-DIS-MICROWSOFT-GERMANY-Production'
Add-ADGroupMember -Identity 'UNI-DIS-MICROWSOFT-SWITZERLAND' -Members 'UNI-DIS-MICROWSOFT-SWITZERLAND-Accounting','UNI-DIS-MICROWSOFT-SWITZERLAND-Sales'

# B1 - If the split permissions model is not used, all steps can be performed directly in Exchange.
New-DistributionGroup -Name 'UNI-DIS-MICROWSOFT-ROOT'
New-DistributionGroup -Name 'UNI-DIS-MICROWSOFT-GERMANY'
New-DistributionGroup -Name 'UNI-DIS-MICROWSOFT-GERMANY-IT'
New-DistributionGroup -Name 'UNI-DIS-MICROWSOFT-GERMANY-Production'
New-DistributionGroup -Name 'UNI-DIS-MICROWSOFT-AUSTRIA'
New-DistributionGroup -Name 'UNI-DIS-MICROWSOFT-SWITZERLAND'
New-DistributionGroup -Name 'UNI-DIS-MICROWSOFT-SWITZERLAND-Accounting'
New-DistributionGroup -Name 'UNI-DIS-MICROWSOFT-SWITZERLAND-Sales'

# B2 - Nesting of groups
Add-DistributionGroupMember 'UNI-DIS-MICROWSOFT-ROOT' -Member 'UNI-DIS-MICROWSOFT-GERMANY'
Add-DistributionGroupMember 'UNI-DIS-MICROWSOFT-ROOT' -Member 'UNI-DIS-MICROWSOFT-AUSTRIA'
Add-DistributionGroupMember 'UNI-DIS-MICROWSOFT-ROOT' -Member 'UNI-DIS-MICROWSOFT-SWITZERLAND'
Add-DistributionGroupMember 'UNI-DIS-MICROWSOFT-GERMANY' -Member 'UNI-DIS-MICROWSOFT-GERMANY-IT'
Add-DistributionGroupMember 'UNI-DIS-MICROWSOFT-GERMANY' -Member 'UNI-DIS-MICROWSOFT-GERMANY-Production'
Add-DistributionGroupMember 'UNI-DIS-MICROWSOFT-SWITZERLAND' -Member 'UNI-DIS-MICROWSOFT-SWITZERLAND-Accounting'
Add-DistributionGroupMember 'UNI-DIS-MICROWSOFT-SWITZERLAND' -Member 'UNI-DIS-MICROWSOFT-SWITZERLAND-Sales'

# Enable new distribution groups for address book hierarchy
Get-Group -Filter 'Name -like "UNI-DIS-MICROWSOFT-*"' | Set-Group -IsHierarchicalGroup $true

# Activate address book hierarchy and store root group
Set-OrganizationConfig -HierarchicalAddressBookRoot 'UNI-DIS-MICROWSOFT-ROOT'

# Set the order of the groups (optional; the higher the value, the higher the ranking)
Set-Group -Identity '<group name>' -SeniorityIndex '<value between 1-100>'
Liked this article? Share it!


One thought on “Hierarchies for Exchange Address Lists - why and how does it work?”