
Modern Authentication in Exchange Server - farewell, NTLM and Kerberos!
For some time now, Microsoft has been pointing out that the NTLM authentication protocol is outdated and that organizations should disable it entirely.
However, this is easier said than done.
In practice, there are still many (older) applications that continue to use NTLM instead of Kerberos for authentication. If NTLM were disabled, these applications would no longer function properly.
One such product is actually Exchange Server. Even in the current Subscription Edition, for example, NTLM is still used—for instance, when a classic hybrid deployment is in place and mailbox migrations are to be performed.
The migration endpoint is still accessed via NTLM. This is also one of the reasons why enhanced protection—in itself a sensible hardening measure—must be disabled in such cases.
But does that mean you first have to completely decommission your Exchange Server to get rid of NTLM?
Modern Authentication
The answer essentially lies in the cloud. For years, other authentication protocols have been established there, typically SAML, OAuth, and OpenID Connect, which builds on OAuth. While SAML is already familiar from Active Directory Federation Services, the other two variants (in the Microsoft context) are available exclusively through Entra ID.
These protocols enable, for example, browser-based login and the use of additional factors such as multi-factor authentication, passwordless login, or phishing-resistant login. This makes them significantly more secure than traditional login with a username and password. All these aspects are summarized under the umbrella term “modern authentication.”
Does Exchange Server support modern authentication?
Yes and no. 😉 It depends on which feature you’re looking at. Basically, OAuth has been supported since Exchange Server 2013 and is also used behind the scenes for communication with Exchange Online, for example for free/busy information and Teams access to on-premises mailboxes.
However, user authentication must be considered separately. Important to note: not all access protocols in Exchange Server support OAuth. In this regard, the experience differs somewhat from Exchange Online. Specifically, OAuth is not available for the following protocols:
- IMAP
- Outlook Anywhere
- POP
If these protocols are still in use, you should consider switching to MAPI over HTTP or replacing/upgrading the affected application(s) whenever possible. Regardless, there are two options for running Exchange Server with modern authentication.
Option 1: Hybrid Modern Authentication
Hybrid modern authentication (HMA) requires that Exchange Server be configured in a hybrid deployment with Exchange Online. Consequently, Entra ID is then used for modern authentication. This enables the use of all authentication methods available in Entra ID, such as passkeys. Conditional access can also be used to granularly control and restrict access to Exchange Server.
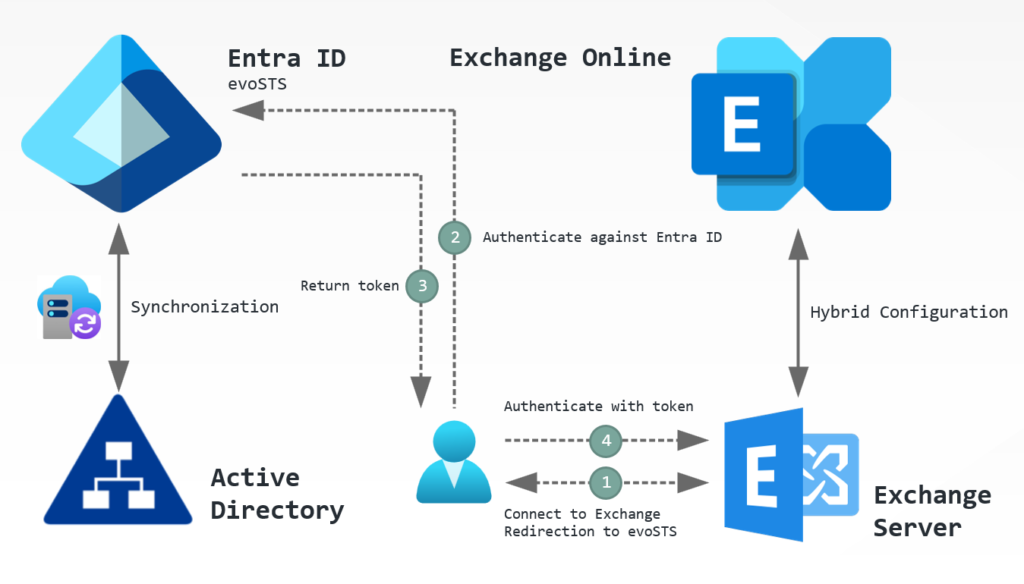
HMA works as follows:
- The user establishes a connection to Exchange Server.
- Exchange Server detects that modern authentication is required and redirects the user to Entra ID (evoSTS, Evolutionary Secure Token Service) for authentication.
- Upon successful authentication (e.g., SSO), Entra ID issues a token.
- The user authenticates with the token on Exchange Server and gains access.
HMA is particularly well-suited for companies that have already decided to use cloud services and may have already completed part of the necessary infrastructure setup.
However, there may be companies that are not yet ready to allow connections to the cloud. For these companies, there is an alternative to HMA.
Option 2: Modern authentication with ADFS
For many years now, Microsoft has been providing a specialized authentication service through Active Directory Federation Services (ADFS). ADFS enables authentication with Active Directory without requiring direct communication via NTLM or Kerberos between domain controllers and end devices or users. To achieve this, ADFS uses the SAML protocol as an intermediary. Third-party products can, in turn, be integrated with ADFS to enable modern authentication methods such as passkeys or, at a minimum, MFA.
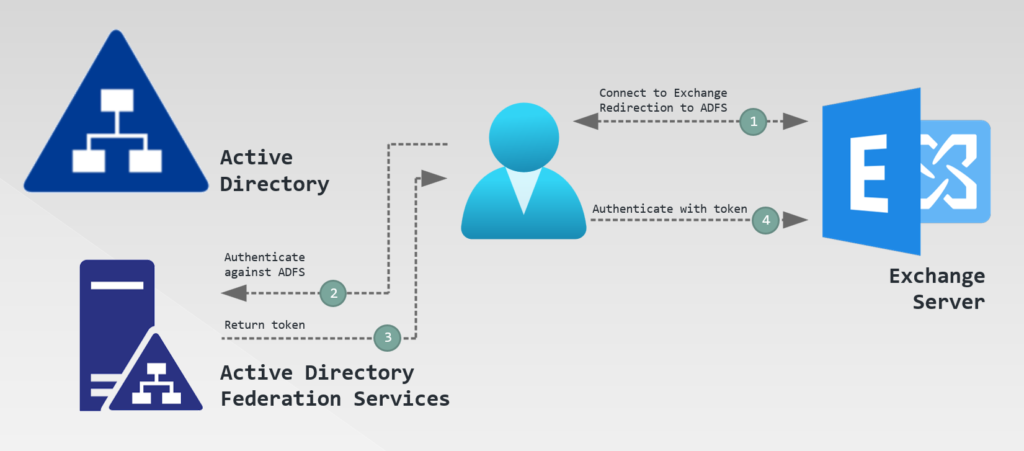
Modern authentication with ADFS works as follows:
- The user establishes a connection to Exchange Server.
- Exchange Server detects that modern authentication is required and redirects the user to the ADFS server or farm for authentication.
- Upon successful authentication (e.g., SSO), ADFS issues a token.
- The user authenticates with the token on Exchange Server and gains access.
Companies that want to or need to operate entirely on-premises can therefore take advantage of ADFS to implement modern authentication with Exchange Server.
Configuration
The following chapters explain how to set up modern authentication for Exchange Server.
Hybrid Modern Authentication
It is assumed that the following prerequisites have already been met:
- Synchronization between Active Directory and Entra ID
- Exchange hybrid deployment without SSL offloading (SSL offloading is not supported for HMA; see Configure Exchange Server to use Hybrid Modern Auth - Microsoft 365 Enterprise | Microsoft Learn)
- Use of a supported Exchange Server version in accordance with the modern lifecycle policy
All steps must be performed using PowerShell. This requires both the Exchange Management Shell and a PowerShell with specific modules for cloud management. These will be named individually below.
Step 1: Determine local configuration
First, the URLs configured for access in the local Exchange organization must be determined. These must be added to the Service Principal's Entra ID if they are not already present. The Exchange Management Shell must be used for this.
# Determine URLs for virtual directories
Get-MapiVirtualDirectory | fl server,*url*,*auth*
Get-WebServicesVirtualDirectory | fl server,*url*,*oauth*
Get-OABVirtualDirectory | fl server,*url*,*oauth*
Get-AutoDiscoverVirtualDirectory | fl server,*oauth*
Get-ActiveSyncVirtualDirectory | fl server,*url*,*auth*In this process, it can also be checked whether OAuth is already enabled for the virtual directories or whether it still needs to be enabled:
# Enable OAuth for MAPI, if not enabled yet
$MapiDirs = Get-MapiVirtualDirectory

# Add OAuth for each directory
ForEach ($MapiDir in $MapiDirs)
   {
   $IISAuthMeth = $MapiDir.IISAuthenticationMethods
   if ($IISAuthMeth -notcontains 'OAuth')
      {
      $IISAuthMeth+='OAuth'
      Set-MapiVirtualDirectory -Identity $MapiDir.Name -IISAuthenticationMethods $IISAuthMeth
      }
   else {Write-Host 'OAuth for MAPI already enabled!' -ForegroundColor Green}
   }

# Check OAuth for web service directories and enable, if not enabled yet
$WebSvcDirs = Get-WebServicesVirtualDirectory

# Add OAuth for each directory
ForEach ($WebSvcDir in $WebSvcDirs)
   {
   if ($WebSvcDir.OAuthAuthentication -eq $False){Set-WebServicesVirtualDirectory -Identity $WebSvcDir.Name -OAuthAuthentication $true}
   else {Write-Host 'OAuth for web services already enabled!' -ForegroundColor Green}
   }

# Check OAuth for offline address book directories and enable, if not enabled yet
$OABDirs = Get-OABVirtualDirectory

# Add OAuth for each directory
ForEach ($OABDir in $OABDirs)
   {
   if ($OABDir.OAuthAuthentication -eq $False){Set-WebServicesVirtualDirectory -Identity $OABDir.Name -OAuthAuthentication $true}
   else {Write-Host 'OAuth for offline address books already enabled!' -ForegroundColor Green}
   }

# Check OAuth for autodiscover directories and enable, if not enabled yet
$AutoDDirs = Get-AutodiscoverVirtualDirectory

# Add OAuth for each directory
ForEach ($AutoDDir in $AutoDDirs)
   {
   if ($AutoDDir.OAuthAuthentication -eq $False){Set-WebServicesVirtualDirectory -Identity $AutoDDir.Name -OAuthAuthentication $true}
   else {Write-Host 'OAuth for Autodiscover already enabled!' -ForegroundColor Green}
   }

# Check OAuth for ActiveSync directories and enable, if not enabled yet
$ActiveSyncDirs = Get-ActiveSyncVirtualDirectory

# Add OAuth for each directory
ForEach ($ActiveSyncDir in $ActiveSyncDirs)
   {
   $IntAuthMeth = $ActiveSyncDir.InternalAuthenticationMethods
   $ExtAuthMeth = $ActiveSyncDir.ExternalAuthenticationMethods
   if ($IntAuthMeth -notcontains 'OAuth')
      {
      $IntAuthMeth+='OAuth'
      Set-ActiveSyncVirtualDirectory -Identity $ActiveSyncDir.Name -InternalAuthenticationMethods $IntAuthMeth
      }
   else {Write-Host 'OAuth for ActiveSync (internal) already enabled!' -ForegroundColor Green}
   if ($ExtAuthMeth -notcontains 'OAuth')
      {
      $ExtAuthMeth+='OAuth'
      Set-ActiveSyncVirtualDirectory -Identity $ActiveSyncDir.Name -ExternalAuthenticationMethods $IntAuthMeth
      }
   else {Write-Host 'OOAuth for ActiveSync (internal) already enabled!' -ForegroundColor Green}
}Furthermore, it must be checked whether the object for redirecting authentication to Entra ID already exists or still needs to be created:
# Check object for evoSTS
Get-AuthServer | Where-Object {$_.Name -like "EvoSts*"} | fl Name,DomainName,IssuerIdentifier,Realm,TokenIssuingEndpoint,Enabled,IsDefault*If this is not present, the Exchange Hybrid Configuration Wizard must be run (again).
Step 2: Add URLs in service principal
Next, a connection to Entra ID must be established via Microsoft Graph to check for and add any missing URLs in the service principal for Exchange Server/Online:
# # Check if needed modules are installed and install, if not
if (!(Get-InstalledModule Microsoft.Graph.Authentication -ErrorAction SilentlyContinue)){Install-Module Microsoft.Graph.Authentication -Scope CurrentUser}
if (!(Get-InstalledModule Microsoft.Graph.Applications -ErrorAction SilentlyContinue)){Install-Module Microsoft.Graph.Applications -Scope CurrentUser}
# Connect to Microsoft Graph
Connect-MgGraph -Scopes 'Application.ReadWrite.All'
# Check current URLs
Get-MgServicePrincipal -Filter "AppId eq '00000002-0000-0ff1-ce00-000000000000'" | select -ExpandProperty ServicePrincipalNames
# Add missing URL(s)
$Principal = Get-MgServicePrincipal -Filter "AppId eq '00000002-0000-0ff1-ce00-000000000000'"
$Principal.ServicePrincipalNames += 'https://autodiscover.microwsoft.de/' # e.g., URL for Autodiscover
$Principal.ServicePrincipalNames += 'https://mail.microwsoft.de/' # e.g., global URL for accessing MAPI, EWS, EAS, usw.
Update-MgServicePrincipal -ServicePrincipalId $Principal.Id -ServicePrincipalNames $Principal.ServicePrincipalNamesStep 3: Enable HMA
Once all prerequisites are met, HMA can be activated via the Exchange Management Shell as follows:
# Set evoSTS als default authorization endpoint and enable OAuth
Set-AuthServer -Identity "EvoSts - d1c9beac-0655-48e7-9949-5e497af1d38d" -DomainName '<default domain, e.g., microwsoft.de>' -IsDefaultAuthorizationEndpoint $true
Set-OrganizationConfig -OAuth2ClientProfileEnabled $true
# Restart web server
iisresetStep 4: Deploy registry value to endpoints
Modern authentication is now fundamentally available. However, Outlook may still be using an older authentication protocol. Therefore, it's advisable to enforce the use of modern authentication. This requires adding a registry value on the endpoints:
Path: HKEY_CURRENT_USER\Software\Microsoft\Exchange
Value: AlwaysUseMSOAuthForAutoDiscover
Type: REG_DWORD
Data: 1
(OPTIONAL) Step 5: Enable HMA for OWA and ECP
HMA can also be used for OWA and ECP. However, please note the following:
- Modern authentication applies not only to users but also to administrator accounts. If these accounts are not synchronized to the cloud in accordance with best practices, they will no longer be able to log in to the web interface.
- OWA and ECP must use the same authentication methods. Therefore, OAuth cannot be enabled for one directory but not for the other—for example, to allow administrator accounts to continue accessing ECP via Kerberos.
If different URLs are used for OWA and ECP, these must also be added to the service principal as shown in Step 2.
Otherwise, OAuth can be enabled as follows (the order is important—first ECP, then OWA):
# 1) Configure ECP directory(ies)
Get-EcpVirtualDirectory | Set-EcpVirtualDirectory -AdfsAuthentication $false -BasicAuthentication $false -FormsAuthentication $false -DigestAuthentication $false -OAuthAuthentication $true
# 2) Configure OWA directory(ies)
Get-OwaVirtualDirectory | Set-OwaVirtualDirectory -AdfsAuthentication $false -BasicAuthentication $false -FormsAuthentication $false -DigestAuthentication $false -OAuthAuthentication $true
# Restart web server
iisresetDid you know? With HMA, users can access their local mailbox via the Outlook Mobile app without the Exchange organization needing to be accessible over the internet. Sounds strange? It works, though, see here: Using hybrid Modern Authentication with Outlook for iOS and Android | Microsoft Learn
Modern Authentication with ADFS
It is assumed that the following prerequisites have already been met:
- An existing ADFS server or farm that has been set up with the basic configuration and valid certificates
All steps must be performed using PowerShell.
Schritt 1: Choose methodology for single sign-on (SSO)
To simplify user access, single sign-on (SSO) can be implemented. Login credentials are automatically passed through, so the user is not prompted for re-authentication. This is possible via the following methods:
| Methodology | Description |
|---|---|
| Device registration | The user performs a Workplace Join with their device. This must be explicitly enabled in ADFS. |
| KSMI | Keep me signed in; ADFS creates a persistent cookie when authenticating the user. This cookie can be valid for 8 hours to 7 days. |
Device registration is more complex to configure, but it improves security. Details on the setup (including KMSI) are provided in the following article: Enable Modern Auth in Exchange Server on-premises | Microsoft Learn
Step 2: Create ADFS Outlook application group
Next, the necessary configuration must be created in ADFS. The following commands must be executed for this purpose:
# Create new application group
New-AdfsApplicationGroup -Name 'Outlook' -ApplicationGroupIdentifier 'Outlook' -Disabled:$false
# Create scopes
Add-AdfsScopeDescription -Name 'EAS.AccessAsUser.All' -Description 'EAS scope'
Add-AdfsScopeDescription -Name 'EWS.AccessAsUser.All' -Description 'EWS scope'
Add-AdfsScopeDescription -Name 'offline_access' -Description 'Offline access'
# Create application - Outlook Desktop
Add-AdfsNativeClientApplication -Name 'Outlook Desktop' -ApplicationGroupIdentifier 'Outlook' -Identifier 'd3590ed6-52b3-4102-aeff-aad2292ab01c' -RedirectUri @('ms-appx-web://Microsoft.AAD.BrokerPlugin/d3590ed6-52b3-4102-aeff-aad2292ab01c','msauth.com.microsoft.Outlook://auth','urn:ietf:wg:oauth:2.0:oob')
# (Optional) Create application - iOS Mail App
Add-AdfsNativeClientApplication -Name 'iOS/macOS - Mail-App' -ApplicationGroupIdentifier 'Outlook' -Identifier 'f8d98a96-0999-43f5-8af3-69971c7bb423' -RedirectUri @('com.apple.mobilemail://oauth-redirect','com.apple.preferences.internetaccounts://oauth-redirect/','com.apple.Preferences://oauth-redirect/')
# Set URLs - enter the URL(s) here which are used for accessing Exchange and Autodiscover
$EXSServiceFQDNs = @('https://autodiscover.microwsoft.de/','https://mail.microwsoft.de/')
# Create transform rules
$issuanceTransformRules = @'
@RuleName = 'ActiveDirectoryUserSID'
c:[Type == 'http://schemas.microsoft.com/ws/2008/06/identity/claims/primarysid']
=> issue(claim = c);
@RuleName = 'ActiveDirectoryUPN'
c:[Type == 'http://schemas.xmlsoap.org/ws/2005/05/identity/claims/upn']
=> issue(claim = c);
@RuleName = 'AppIDACR'
=> issue(Type = 'appidacr', Value = '2');
@RuleName = 'SCP'
=> issue(Type = 'scp', Value = 'user_impersonation');
@RuleName = 'SCPEAS'
=> issue(Type = 'scp', Value = 'EAS.AccessAsUser.All');
@RuleName = 'SCPEWS'
=> issue(Type = 'scp', Value = 'EWS.AccessAsUser.All');
@RuleName = 'offlineaccess'
=> issue(Type = 'scp', Value = 'offline_access');
'@
# Create web API applications
foreach ($FQDN in $EXSServiceFQDNs)
{
Add-AdfsWebApiApplication -Name 'Outlook - Web-API ($((New-Guid).ToString('N')))' -ApplicationGroupIdentifier 'Outlook' -Identifier $fqdn -IssuanceTransformRules $issuanceTransformRules -AccessControlPolicyName 'Permit Everyone'
}
# Add client permissions in web API applications
$clientRoleIdentifier = @('f8d98a96-0999-43f5-8af3-69971c7bb423','d3590ed6-52b3-4102-aeff-aad2292ab01c')
(Get-AdfsWebApiApplication -ApplicationGroupIdentifier 'Outlook') | ForEach-Object {
[string]$serverRoleIdentifier = $_.Identifier
foreach ($id in $clientRoleIdentifier) {
Grant-AdfsApplicationPermission -ClientRoleIdentifier $id -ServerRoleIdentifier $serverRoleIdentifier -ScopeNames 'winhello_cert','email','profile','vpn_cert','logon_cert','user_impersonation','allatclaims','offline_access','EAS.AccessAsUser.All','EWS.AccessAsUser.All','openid','aza'
}
}Schritt 3: Create policies for selectively enabling modern authentication
By default, clients always attempt to use OAuth for authentication. However, some clients may not be compatible with the ADFS variant and therefore cannot connect. Therefore, policies must be created to block modern authentication by default and only allow it for selected mailboxes.
# Create policy for blocking modern authentication
New-AuthenticationPolicy 'POL-EXO-BLOCK-ModernAuthentication' -BlockModernAuthWebServices -BlockModernAuthActiveSync -BlockModernAuthAutodiscover -BlockModernAuthImap -BlockModernAuthMapi -BlockModernAuthOfflineAddressBook -BlockModernAuthPop -BlockModernAuthRpc
# Globally configure policy
Set-OrganizationConfig -DefaultAuthenticationPolicy 'POL-EXO-BLOCK-ModernAuthentication'
# Create policy for selectively allowing modern authentication
New-AuthenticationPolicy 'POL-EXO-ALLOW-ModernAuthentication'
# Assign policy to mailbox(es)
Set-Mailbox -Identity <Name> -AuthenticationPolicy 'POL-EXO-ALLOW-ModernAuthentication'Schritt 4: Enable OAuth for virtual directories
OAuth must be added for the virtual directories. The following commands can automatically add OAuth if it is not already present:
# Enable OAuth for MAPI, if not enabled yet
$MapiDirs = Get-MapiVirtualDirectory

# Add OAuth for each directory
ForEach ($MapiDir in $MapiDirs)
   {
   $IISAuthMeth = $MapiDir.IISAuthenticationMethods
   if ($IISAuthMeth -notcontains 'OAuth')
      {
      $IISAuthMeth+='OAuth'
      Set-MapiVirtualDirectory -Identity $MapiDir.Name -IISAuthenticationMethods $IISAuthMeth
      }
   else {Write-Host 'OAuth for MAPI already enabled!' -ForegroundColor Green}
   }

# Check OAuth for web service directories and enable, if not enabled yet
$WebSvcDirs = Get-WebServicesVirtualDirectory

# Add OAuth for each directory
ForEach ($WebSvcDir in $WebSvcDirs)
   {
   if ($WebSvcDir.OAuthAuthentication -eq $False){Set-WebServicesVirtualDirectory -Identity $WebSvcDir.Name -OAuthAuthentication $true}
   else {Write-Host 'OAuth for web services already enabled!' -ForegroundColor Green}
   }

# Check OAuth for offline address book directories and enable, if not enabled yet
$OABDirs = Get-OABVirtualDirectory

# Add OAuth for each directory
ForEach ($OABDir in $OABDirs)
   {
   if ($OABDir.OAuthAuthentication -eq $False){Set-WebServicesVirtualDirectory -Identity $OABDir.Name -OAuthAuthentication $true}
   else {Write-Host 'OAuth for offline address books already enabled!' -ForegroundColor Green}
   }

# Check OAuth for autodiscover directories and enable, if not enabled yet
$AutoDDirs = Get-AutodiscoverVirtualDirectory

# Add OAuth for each directory
ForEach ($AutoDDir in $AutoDDirs)
   {
   if ($AutoDDir.OAuthAuthentication -eq $False){Set-WebServicesVirtualDirectory -Identity $AutoDDir.Name -OAuthAuthentication $true}
   else {Write-Host 'OAuth for Autodiscover already enabled!' -ForegroundColor Green}
   }

# Check OAuth for ActiveSync directories and enable, if not enabled yet
$ActiveSyncDirs = Get-ActiveSyncVirtualDirectory

# Add OAuth for each directory
ForEach ($ActiveSyncDir in $ActiveSyncDirs)
   {
   $IntAuthMeth = $ActiveSyncDir.InternalAuthenticationMethods
   $ExtAuthMeth = $ActiveSyncDir.ExternalAuthenticationMethods
   if ($IntAuthMeth -notcontains 'OAuth')
      {
      $IntAuthMeth+='OAuth'
      Set-ActiveSyncVirtualDirectory -Identity $ActiveSyncDir.Name -InternalAuthenticationMethods $IntAuthMeth
      }
   else {Write-Host 'OAuth for ActiveSync (internal) already enabled!' -ForegroundColor Green}
   if ($ExtAuthMeth -notcontains 'OAuth')
      {
      $ExtAuthMeth+='OAuth'
      Set-ActiveSyncVirtualDirectory -Identity $ActiveSyncDir.Name -ExternalAuthenticationMethods $IntAuthMeth
      }
   else {Write-Host 'OOAuth for ActiveSync (internal) already enabled!' -ForegroundColor Green}
}Schritt 5: Configure Exchange Server for using modern authentication
Now, the ADFS server can be configured for modern authentication in the Exchange organization. To do this, execute the following commands:
# Create new authentication server object
New-AuthServer -Type ADFS -Name '<name of ADFS server /farm>' -AuthMetadataUrl 'https://<ADFS server/farm URL>/FederationMetadata/2007-06/FederationMetadata.xml'

# Set authentication server object as default authorization endpoint and enable OAuth
Set-AuthServer -Identity '<name of ADFS server /farm>' -IsDefaultAuthorizationEndpoint $true
Set-OrganizationConfig -OAuth2ClientProfileEnabled $true

# (Optional) If macOS is used, additionally execute the following commands
New-SettingOverride -Name 'EnableKeepADFSHeadersOnTokenExpiry' -Component 'OAuth' -Section 'KeepADFSHeadersOnTokenExpiry' -Parameters @('Enabled=true') -Reason 'Outlook für macOS'
Get-ExchangeDiagnosticInfo -Process Microsoft.Exchange.Directory.TopologyService -Component VariantConfiguration -Argument Refresh

# Restart web server
iisresetSchritt 6: Enable modern authentication on endpoints
To enable modern authentication via ADFS on endpoints, some settings still need to be distributed as registry values:
Two keys are created that contain the URL to ADFS - one with and one without a trailing '/'.
Path: HKEY_LOCAL_MACHINE\SOFTWARE\Policies\Microsoft\AAD\AuthTrustedDomains
Value: <ADFS server/farm URL>/
Type: KeyPath: HKEY_LOCAL_MACHINE\SOFTWARE\Policies\Microsoft\AAD\AuthTrustedDomains
Value: <ADFS server/farm URL>/
Type: Key
Path: HKCU\SOFTWARE\Microsoft\Office\16.0\Common\Identity
Value: EnableExchangeOnPremModernAuth
Type: REG_DWORD
Data: 1
For macOS, ADFS is configured as follows (via Terminal):
defaults write com.microsoft.Outlook ADFSAuthorizedURLs -array <ADFS server/farm URL>
(OPTIONAL) Step 7: Enable claims-based authentication for OWA and ECP
ADFS-based login can also be configured for OWA and ECP. Configuration can be done via the ADFS console and is described in detail in the official article: Use AD FS claims-based authentication with Outlook on the web | Microsoft Learn
Liked this article? Share it!