
Control granular permissions for servers and clients via Active Directory—with group policies and PowerShell!
Local Active Directory infrastructures remain widespread and are therefore a popular target for attackers. To effectively reduce the attack surface and harden the infrastructure against attacks, numerous guides and articles are now available. Broadly speaking, the recommendations can be divided into the following topics:
| Topic | Empfehlung(en) |
|---|---|
| Zero Trust | - No system or user is automatically trusted; all access must be verified. - Username and password are no longer sufficient for authentication; additional verification (MFA) is required. |
| Security tiers | - Systems are divided into security levels according to their criticality and type. - No user may have permissions that extend beyond security boundaries/tiers. |
| Administration principles | - Access may only be granted or requested for the necessary purpose (least privilege or Just Enough Administration principle) - Access may only be set up or requested for the required period of time (least privilege or just-in-time administration principle). |
This article discusses how Active Directory security groups can be used to support the administrative principles listed in the table.
Procedures
By default, in Active Directory, the “Domain Admins” group is added to the local ‘Administrators’ group on every server or client that is added to the domain. This is usually changed at the latest when security levels are introduced, as the “Domain Admins” belong to level 0 and member servers and clients are usually assigned to a different level.
Depending on security requirements and, if applicable, the size of the company's IT department, administrators are granted access in different ways:
- Small organizations: Create one security group per level and add this group to all systems of a level via a Group Policy Object (GPO).
- Medium-sized organizations: Create security groups for each server/client and add these groups to the respective system via a Group Policy Object (GPO).
- Large organizations: Create security groups for each server service or client and add these groups to the respective system via PowerShell. Just Enough Administration
The second option is a good compromise, as it allows rights to be assigned individually for each system without much effort. However, manually creating the necessary groups can be quite time-consuming and error-prone, as this must be taken into account each time a new system is added.
It is much nicer and more efficient to have the necessary groups created automatically—ideally when a new system is added to the domain! This can be done easily using a combination of group policies and PowerShell. And nothing needs to be installed on the devices. How does it work? Read on to find out!
Preparations
Before the script will work, some preparations must be made. These are described below.
Permissions for Active Directory
The script is executed in the context of the computer account (SYSTEM). Therefore, the computer account must be granted permission to create groups in Active Directory. This can be achieved in several ways:
- Using the default group "Domain Computers," to which all computer accounts are automatically members (not recommended, as the group includes objects of all security levels (tiers)).
- Creating a custom group (or multiple groups) and adding new computer accounts via a separate, automatically running script (the script can, for example, be event-driven).
Important: The more general the permission group used, the more narrowly its permissions must be defined! This prevents the granting of unnecessary/excessive rights that could then be misused for other purposes.
Alternatively, the process can be set up as follows:
- Computer accounts are not granted any permissions. Instead, a (group-managed) service account is created and granted permission to create groups.
- The script for creating the groups is then run as soon as a new computer account is added to the domain (e.g., on an event-driven basis).
- The script and the scheduled task are not run on the servers/clients themselves, but on a management server.
Regardless of the group type, the necessary permissions are configured as follows:
- Open “Active Directory Users and Computers.”
- Navigate to the organizational unit where the groups are to be created.
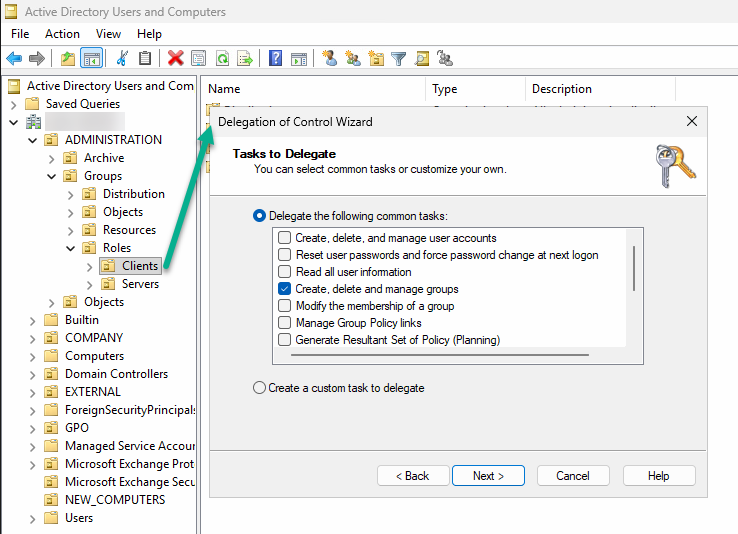
- Right-click on the OU and select “Assign Object Management…”
- Select the group/service account to be authorized
- Select the “Create, delete, and manage groups” permission or, alternatively, assign only the desired granular permissions using the “Custom Tasks…” option (recommended)
- Repeat the steps for additional OUs, if necessary
Script policies
By default, Windows is set up so that only signed scripts can be executed in the context of the SYSTEM account. It is generally advisable to keep this setting. However, the script must be digitally signed so that it can be executed when the computer is started.
This requires a certificate with the purpose “code signature,” which can be obtained from either an internal or public certification authority. Furthermore, the systems must trust the certificate. If a corresponding certificate is available, the script can be signed as follows:
# Read code signature certificate
$cert = Get-ChildItem -Path Cert:\CurrentUser\My -CodeSigningCert

# Sign script
Set-AuthenticodeSignature -FilePath <Pfad>\<zum>\<Skript>.ps1 -Certificate $certTip: If you'd like to sign your scripts but don't know how, check out this post: Run scripts with confidence - using code signing certificates!
This may not be possible in smaller environments. In this case, the execution policy can be set via a group policy so that the execution of scripts is generally permitted:
Computer Configuration > Policies > Administrative Templates > Windows Components > Windows PowerShell > Enable script execution > Enabled, Allow all scripts
However, this significantly reduces security, as it allows arbitrary scripts to be executed in the SYSTEM context. Therefore, this is generally not recommended.
Script for automatic creation of security groups
If all prerequisites are met, the script can be rolled out to all computer objects via a group policy object.
Computer Configuration > Policies > Windows Settings > Scripts (Startup/Shutdown) > Startup > PowerShell Scripts > Add...
You can find the complete script in my script nest. The following explains exactly how the script works.
The script must first be adapted to your own environment as follows - especially if it is to be executed not by the end device itself, but via a service account on an administration server::
- Paths to the client and server OU.
- Names of the role groups to be created and their description. If necessary, additional groups can be added here using the same scheme.
Important: the name of the groups MUST contain the name of the device so that the groups can be dynamically/individually assigned to the system via the group policy or the corresponding script function!
 # EXAMPLE VALUES - MODIFY TO YOUR NEEDS
 $Script:ClientOUPath = 'OU=Workstations,OU=Roles,OU=Groups,OU=ADMINISTRATION,'
 $Script:ServerOUPath = 'OU=Server,OU=Roles,OU=Groups,OU=ADMINISTRATION,'
 $Script:AdminsGroup = 'ROL-SEC-' + $ENV:ComputerName + '-Admins'
 $Script:AdminsDesc = 'Members of this group are assigned administrative permissions for the given system'
 $Script:LocalAdmGroupSID = 'S-1-5-32-544'
 $Script:RDUsersGroup = 'ROL-SEC-' + $ENV:computername + '-RD-Benutzer'
 $Script:RDUsersDesc= 'Members of this group are allowed to login to the given system via RDP'
 $Script:LocalRDGroupSID = 'S-1-5-32-555'

# Summarize groups - add groups as needed
$GroupNames = $AdminsGroup,$RDUsersGroup
$GroupDescriptions = $AdminsDesc,$RDUsersDesc
$LocalGroups = $LocalAdmGroup,$LocalRDGroupBased on this, a table is then created, which is subsequently worked through step by step:
# Summarize groups - add groups as needed
$GroupNames = $AdminsGroup,$RDUsersGroup
$GroupDescriptions = $AdminsDesc,$RDUsersDesc
$LocalGroups = $LocalAdmGroup,$LocalRDGroup

# Build table from variables
$Script:AccessGroups = For ($i = 0;$i -lt $GroupNames.Count;$i++)
    {
    [PSCustomObject]@{
       GroupName = $GroupNames[$i]
       Description = $GroupDescriptions[$i]
       LocalGroup = $LocalGroups[$i]
       }
}The following sections define and execute several functions:
| Function | Description |
|---|---|
| GetADInfo | Provides commands to retrieve the information necessary for script execution from Active Directory, based on functions integrated into Windows. This eliminates the need to install an additional PowerShell module (such as Active Directory PowerShell). |
| DefineVariables | It retrieves the necessary information from Active Directory and the system and assembles the corresponding variables. |
| CreateGroups | Erstellt die Gruppen in den zuvor definierten Pfaden im Active Directory. |
| NestGroups | OPTIONAL - Verschachtelt die zuvor erstellten Gruppen direkt in die lokalen Gruppen des Systems. Dies kann die Nutzbarkeit beschleunigen, da das Skript nur bei einem (Neu)Start des Systems ausgeführt wird. |
If everything has been configured correctly, the defined security groups should be created automatically in the organizational unit defined in the script.
Nest the new groups on the system
Finally, the automatic nesting of the new groups on the systems needs to be configured. The same Group Policy Object (GPO) used for running the script can be used for this. Alternatively, a different GPO can be used if local group management is already handled by another GPO (possibly centrally).
Computer Configuration > Settings > Control Panel Settings > Local Users and Groups > New > Local Group
Group name: <select the appropriate local group>
Description: <copy the description of the group from Active Directory>
Members: Do not select a group, but enter the following manually in the field:<Domain name>\<group name with variable for computername>, e.g., MICROWSOFT\ROL-SEC-%COMPUTERNAME%-Admins
In this way, the respective group is dynamically nested within the respective system.
Tip: Precede the description with “[GPO]” so that it is immediately apparent on the system that the group is controlled by group policies.
Liked this article? Share it!