
Scrooged - effective protection against Ghost Sender in Exchange Online
Exchange Online is quite flexible when it comes to message flow. For example, emails can be delivered directly to Exchange Online from external sources or routed through an upstream email gateway. The latter is not uncommon in companies.
In the past, a third-party filtering solution may have been purchased and deployed for Exchange Server, since the built-in capabilities of Exchange Server, while nice, are not sufficient. When switching to Exchange Online, this solution was initially retained to avoid creating an additional point of complexity. In principle, there is no reason not to continue using a third-party solution.
However, in certain scenarios, this can make Exchange Online vulnerable to spoofing attacks. This is not a security vulnerability in the traditional sense, but rather a design issue. I would like to extend special thanks to the security researchers at InfoGuard Labs, who identified and published this issue along with potential solutions! For more information, visit Ghost-Sender - Universal Email Spoofing against Exchange Online - InfoGuard Labs.
Fortunately, from a technical standpoint, this can be mitigated quite easily. And this article shows you what you need to do!
How do the ghosts get into the shell?
Like any email system, Exchange Online is fundamentally configured to initially accept emails from all senders and sending systems. In itself, this is not unusual. However, the protection mechanisms in Exchange Online rely on emails being delivered directly—that is, without an intermediary system.
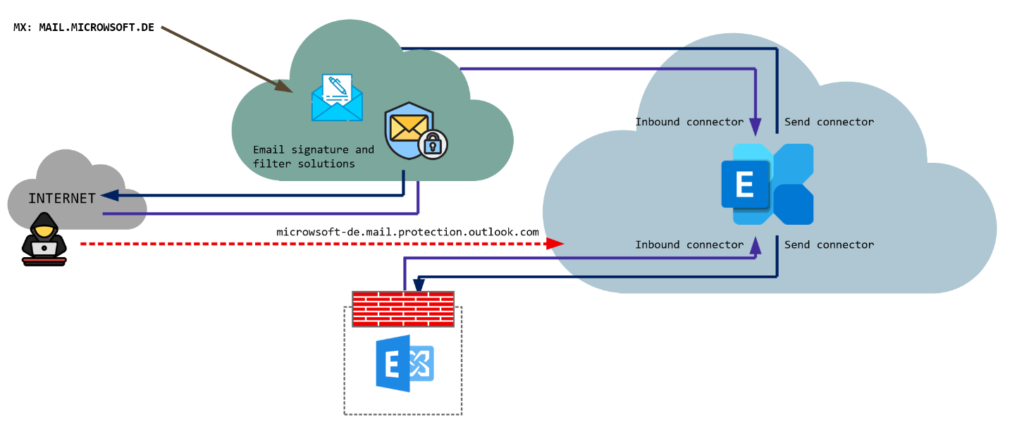
If a third-party system is used, Exchange Online essentially relies on the third-party system to have appropriate security measures in place.
For incoming messages, Exchange Online sets up a receive connector to accept emails from this system. However, a misconfiguration may occur here, causing Exchange Online to continue accepting emails delivered directly.
In Exchange Online, there are two types of receive connectors:
- Your Organization / On-Premises
- Partner Organization
The “Your Organization” receive connector does not enforce the rejection of emails that do not originate from an accepted system. If this type is used, Exchange Online is therefore fundamentally vulnerable to this attack. However, this connector type is used very frequently because third-party systems are often hosted in the organization’s own data center, making this type seem like the obvious choice. Even third-party providers typically use this connector type for their setup wizards.
An attacker can thus bypass all intermediary systems and send forged emails directly to Exchange Online. And the critical issue here is that common protection mechanisms such as SPF, DKIM, and DMARC are also completely bypassed, since Exchange Online accepts the emails without further verification.
Throw the ghosts out of the shell
Microsoft does not currently view this issue as a security problem and will therefore not take any action. Consequently, organizations must take their own measures to protect themselves against such attacks. That said, Microsoft has provided some possible measures for this purpose:
- Deploy a “Partner” connector and configure it so that emails
- are accepted only from specific IP addresses or
- when a specific certificate is used.
- Create a transport rule that blocks all incoming emails except those from specific sender addresses.
Which option is better depends on the company’s specific circumstances. In general, a connector with certificate-based restrictions seems to be the best approach, since IP addresses are subject to change and the connector must therefore be repeatedly checked and maintained.
The following chapters describe the procedure for each variant. You can also use a script from my script nest to check your environment for this vulnerability and, if necessary, create connectors and disable direct send.
Create a connector
To do this in the Exchange Online Admin Center, follow these steps:
- Open Exchange admin center
- Click "+ Add a connector"
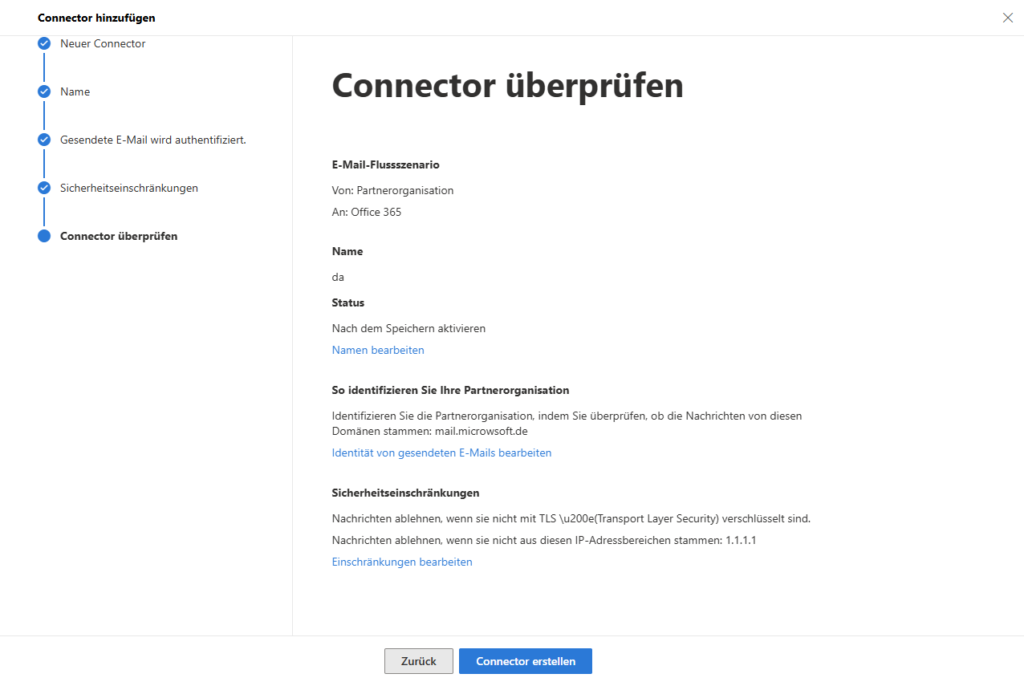
- "From: Partner organization"
- Assign a descriptive name and add a description if needed; uncheck the “Turn it on” box
- Under “How to identify your partner organization,” select the option “By verifying that the sender domain matches one of the following domains” and add an * (= all sender domains)
- Under “Security Restrictions”…
- ...leave the checkbox for “Reject emails if they are not sent via TLS” checked, and
- check the box for “Reject emails if they are not sent from this IP address range” and add the source IP address(es) from which emails should be accepted
- NOTE: If you want to specify IP addresses, the wizard accepts a maximum of /24 networks. If a provider uses larger networks (e.g., /19, /21, etc.), these must be divided into /24 networks accordingly.
- “Create Connector”
To do this using PowerShell, follow these steps:
# Check if module is installed and install for current user, if not
if (!(Get-InstalledModule ExchangeOnlineManagement -ErrorAction SilentlyContinue))
   {
   Write-Host 'Module "ExchangeOnlineManagement" not installed, installing for current user...' -ForegroundColor Yellow
   Install-Module ExchangeOnlineManagement -Scope CurrentUser -Confirm:$False
   }

# Connect to Exchange Online
Write-Host ''
Write-Host 'Connecting to Exchange Online...' -ForegroundColor Yellow
Connect-ExchangeOnline -ShowBanner:$False

# Create partner connector
New-InboundConnector -Name <descriptive connector name> -Enabled $False -ConnectorType 'Partner' -SenderIPAddresses <Comma separated list of allowed IP addresses> -SenderDomains '*' -RequireTls $True -RestrictDomainsToIPAddresses $TrueCreate a transport rule
Alternatively, you can set up a transport rule that works on the same principle (accepting emails only from specific sender addresses). To do this, follow these steps:
- Open Exchange Online Admin Center: Exchange admin center
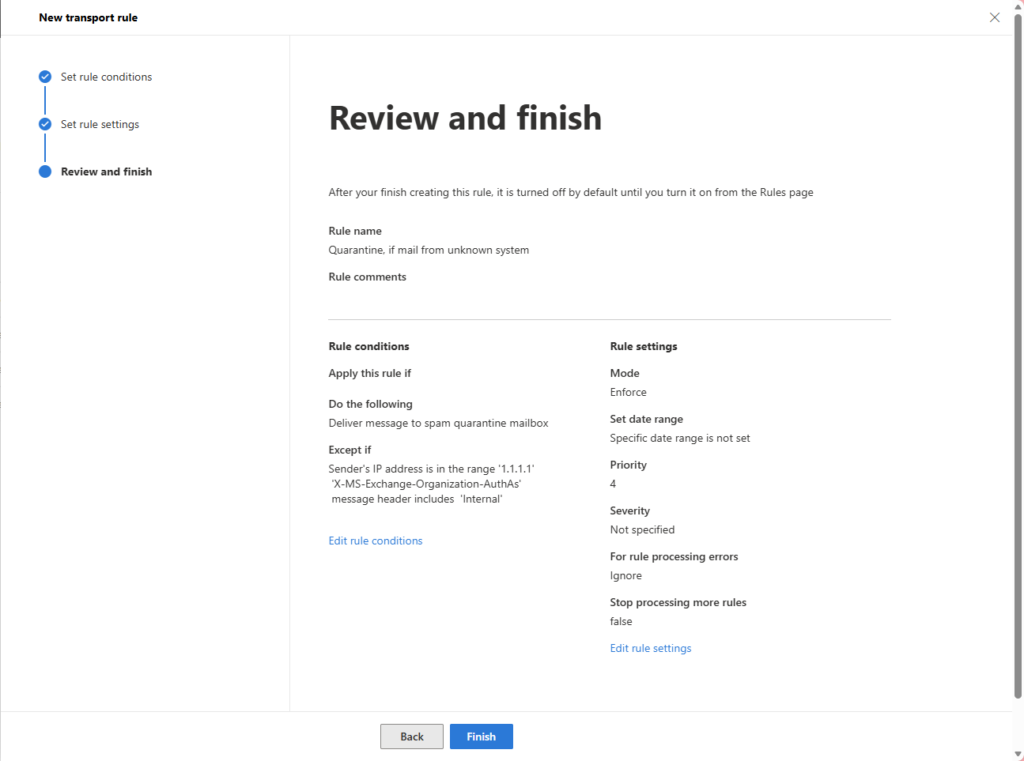
- Select “+ Add a rule” and choose “Create a rule” from the list
- Assign a descriptive name
- “Apply this rule when: Apply to all messages”
- “Proceed as follows: Redirect message to / spam quarantine mailbox”
- “Except if: The sender / IP is in one of these ranges or matches exactly,” enter the allowed IP addresses here
- Click the + to the right of “Except if”
- “Or: The message headers / Contains at least one of these words”
- Click “Enter text” and add the label X-MS-Exchange-Organization-AuthAs
- Click “Enter words” and add the text Internal
- “Next,” “Finish”
To do this using PowerShell, follow these steps:
# Check if module is installed and install for current user, if not
if (!(Get-InstalledModule ExchangeOnlineManagement -ErrorAction SilentlyContinue))
   {
   Write-Host 'Module "ExchangeOnlineManagement" not installed, installing for current user...' -ForegroundColor Yellow
   Install-Module ExchangeOnlineManagement -Scope CurrentUser -Confirm:$False
   }

# Connect to Exchange Online
Write-Host ''
Write-Host 'Connecting to Exchange Online...' -ForegroundColor Yellow
Connect-ExchangeOnline -ShowBanner:$False

# Create transport rule
New-TransportRule -Name "<descriptive name>" -Quarantine $true -ExceptIfHeaderContainsMessageHeader 'X-MS-Exchange-Organization-AuthAs' -ExceptIfHeaderContainsWords 'Internal' –ExceptIfSenderIpRanges "<comma-separated list of allowed IP addresses>" -StopRuleProcessing $true -Priority 0 Customize existing connectors
It is not always necessary to create a new connector. In some cases, existing connectors can simply be modified. However, this is only possible if the connector is already of the “Partner” type. It is not possible to convert a connector to the ‘Partner’ type. Connectors of the “OnPremises” type must therefore be recreated.
The “Partner” type is mandatory, as it is the only type that rejects emails that do not meet the restrictions.
- Open Exchange Online admin center
- Select the connector to configure
- In the flyout menu, click the blue link “Edit sent email identity”
- Select the option “Identify the partner organization by verifying that messages are coming from these domains:” and add an * (= all sender domains), then click “Save”
- In the flyout menu, click the blue link “Edit restrictions”
- Enable the option “Reject email messages if they aren't sent within this IP address range:” and enter the list of allowed IP addresses, then click “Save”
To do this using PowerShell, follow these steps:
# Check if module is installed and install for current user, if not
if (!(Get-InstalledModule ExchangeOnlineManagement -ErrorAction SilentlyContinue))
   {
   Write-Host 'Module "ExchangeOnlineManagement" not installed, installing for current user...' -ForegroundColor Yellow
   Install-Module ExchangeOnlineManagement -Scope CurrentUser -Confirm:$False
   }

# Connect to Exchange Online
Write-Host ''
Write-Host 'Connecting to Exchange Online...' -ForegroundColor Yellow
Connect-ExchangeOnline -ShowBanner:$False

# Modify partner connector
Set-InboundConnector -Name <existing connector name> -SenderIPAddresses <comma-separated list of allowed email addresses> -SenderDomains '*' -RequireTls $True -RestrictDomainsToIPAddresses $TrueAnd what about Direct Send?
Direct Send is a feature that allows emails to be sent from any sender address within your own domains via a special SMTP endpoint. It was originally designed as an alternative for systems that cannot authenticate with Exchange Online (for example, because they do not support authentication or do not support OAuth).
In 2025, it was discovered that attackers were exploiting this feature to send spoofed emails to internal recipients. To do so, the attackers simply had to identify which accepted domains were present in the environment.
Since then, this feature can be fully disabled. This is also in line with current recommendations. If a company still needs to use the feature, usage can be restricted to specific IP addresses — similar to the approach taken with the “Ghost Sender” issue. To do this, a transport rule can be created as shown above.
Hat Dir dieser Artikel gefallen? Lass es andere wissen!