
The Microsoft Cloud Transformation | Part 1: Once upon a time... it started with an Azure subscription
 Krähe mit Hut
Der erste Schritt eines Unternehmens in die Microsoft Cloud erfolgt typischerweise (nicht immer) über Microsoft 365. Dies liegt auch nahe, da eher im Benutzerkontext nach Möglichkeiten zur Entlastung und Modernisierung gesucht wird. Die sogenannten A company’s first step into the Microsoft Cloud typically (though not always) begins with Microsoft 365. This makes sense, as opportunities to streamline operations and modernize systems are often sought in the context of end-user needs. So-called productivity services—such as email, instant messaging, and telephony—make up a large part of a company’s IT infrastructure. Consequently, a significant portion of the workload arises in these areas.
At some point, however, you will inevitably come into contact with Azure. Typical entry points include, for example:
- You want to use services in Microsoft 365 that require usage-based billing.
- Developers want to deploy services and applications that cannot be set up in their own data center, or can only be set up with considerable effort.
- Governance features such as access controls are to be implemented in Entra ID, which require usage-based billing.
However, if an IT department has previously focused exclusively on Microsoft 365, the following questions may arise:
What exactly is Azure?
What does it actually entail?
Can Azure really provide me with any added value, and if so, what specifically?
This article—and, more broadly, the series on which it is based—aims to provide answers to these questions. First, we’ll explore what Azure actually is. Then, we’ll show you how to lay the groundwork for getting started with Azure.
What is Azure?
To answer this question, let’s imagine the following scenario:
You have a data center at one of your locations. In this data center, you operate several servers that work together as a logical unit (known as a cluster). Virtualization software is installed on these servers. This software makes it possible to run many virtual servers (as well as clients) on the physical systems. You use these virtual servers to provide various services and applications, such as Active Directory, DNS, specialized accounting applications, Exchange Server for email, SharePoint Server as a platform for projects, and so on.

That’s exactly what Azure is: a data center in the cloud, provided and operated by Microsoft. It comes with a significant advantage: You don’t have to worry about the hardware used to run it.
Not only that, but Microsoft and third-party providers offer a wide range of templates for services and applications. So, unlike in your own data center, you don’t have to install and configure virtual servers from scratch; instead, you can choose from a variety of pre-built configurations and get started almost immediately.
Let’s illustrate this using Microsoft SQL Server (a database solution) as an example. In my own data center, I need to do the following to set this up:
- Install and configure (virtual) servers (ideally multiple servers for high availability)
- Download the installation files for SQL Server and the latest cumulative update
- Configure the necessary prerequisites (e.g., Active Directory, network)
- Install SQL Server and the update
- Customize the SQL Server configuration to meet the specific requirements of the application that accesses it
- Create maintenance schedules for data backups and add a target storage medium
- Supplement system administration accordingly (system monitoring, updates for the operating system and SQL, maintenance windows)
In Azure, the process looks like this:
- Configure the necessary prerequisites (e.g., Entra ID, network)
- Select the required size and performance for the SQL database
- Deploy the SQL database
Updates are applied automatically. Data backup is automatically enabled, and I don’t have to worry about the storage space required for it. If the performance isn’t sufficient, it can be scaled up at any time without downtime. This is, of course, a greatly simplified explanation, but the basic idea comes through: deployment can be much faster and more efficient.
Accordingly, for example, the Microsoft 365 services run on the Azure platform (they use the same physical foundation and infrastructure). This brings us back to the example mentioned at the beginning—the M365 productivity services are deployed as part of the overall infrastructure in the data center.
What is an Azure subscription?
It should now be clear that Microsoft does not provide the platform for free. Accordingly, just as with Microsoft 365, a subscription is required to use services in Azure. This is also referred to as an Azure plan. The subscription itself is free. So you can safely add a subscription and explore it at no cost. Inactive subscriptions (i.e., those unused for 12 months) are automatically deleted by Microsoft after 120 days at the latest.
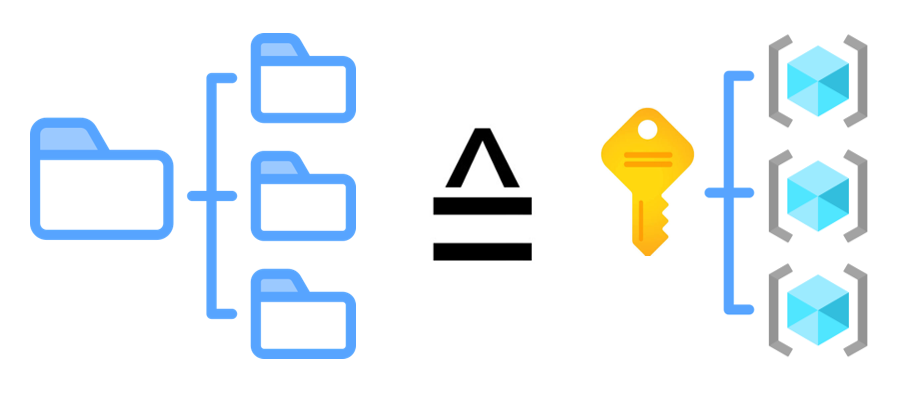
You can think of a subscription, in a sense, as a folder where all Azure resources are stored. Similar to a folder system, you can create additional folders (i.e., add more Azure plans) or subfolders (known as resource groups) to further separate the resources from one another.
This makes it easier, for example, to allocate costs to specific business units. It also allows resources to be organized by type, department, location, or usage scenario.
Billing model
Billing in Azure works differently than what you might be used to with Microsoft 365 (although Microsoft 365 is now increasingly aligning with the Azure model).
In Microsoft 365, there is a clear allocation for most services—a user receives a license and, with it, access to all services included in that license. This access has no time or usage limits. A user can access the licensed services an unlimited number of times within the paid period (e.g., one month or one year) and is not restricted by a specific volume or loses access. This approach enables relatively clear budget planning and a transparent cost model.

However, Azure uses usage-based billing. Microsoft tracks usage down to the second or day, depending on the service, and bills the total cost on a monthly basis. That said, costs can arise not only from the service itself but also from dependencies that the service uses, such as:
- Incoming and outgoing network traffic (through access to the service or when the service transfers data to a system outside of Azure)
- Use of private endpoints (enable the exclusively internal deployment of a service, e.g., via VPN)
- Data storage (e.g., in a storage account, in an SQL database, etc.)
This makes it difficult, if not impossible, to accurately forecast costs before deploying a service. Although Microsoft provides a pricing calculator (Pricing calculator | Microsoft Azure), even this tool can only provide an approximate estimate of costs.

Accordingly, it makes sense to use the Cost Management feature, which is available within every Azure subscription (Get started with Cost Management reporting - Azure - Microsoft Cost Management | Microsoft Learn).
On the one hand, this feature enables an analysis of current costs. On the other hand, it provides an automatic cost forecast for the remainder of the month. Consequently, it is possible to continuously monitor and optimize current costs.
In addition, you can set budgets and alerts. This prevents sudden spikes in costs from going unnoticed until the bill arrives. However, budgets serve only as alert thresholds. This means that a service is not automatically stopped when it reaches the budget limit. This helps avoid potentially critical outages caused by a service suddenly becoming unavailable.
More and more Microsoft 365 services are now also billed according to this model and can be monitored in the same way, for example:
- Microsoft 365 Backup and Archive
- High-volume email
- Additional storage for SharePoint Online and OneDrive
- Electronic Signatures with Microsoft 365 eSignature
Therefore, it makes sense to take a close look at cost management and make full use of all monitoring and alerting features.
Subscription models
There are several ways to purchase Azure subscriptions. Each option has its pros and cons:
| Model | Advantages | Disadvantages |
|---|---|---|
| Direct purchase from Microsoft | + Direct support from Microsoft | - No discounts - Cannot switch directly to a CSP partner (resources must be migrated or set up from scratch) - Credit card may be the only available payment method* |
| Cloud Solution Provider (Microsoft partner) | + Discounts available + Microsoft provides fundings for Azure projects + Easy migration of subscriptions to another partner | - No direct support from Microsoft (the partner is responsible, but can submit a request to Microsoft) |
By default, when activating a new subscription through Microsoft, you must provide a valid credit card. You can also request that the subscription be set up for payment by invoice by submitting a support request; however, this requires approval.
In principle, therefore, purchasing a subscription through a partner seems to be the more sensible option, as it offers greater flexibility.
Ways to reduce operating costs
In addition to careful planning regarding the size and performance of the services provided, there are other ways to reduce the ongoing costs of resources in Azure. However, these options are not available for all services. Furthermore, these options are designed for specific purposes. Accordingly, you must evaluate which option makes more sense for each use case.
Reservations
Reservations are booked for a period of one or three years. Payment can be made monthly or in advance (with no price difference between these options).
In a sense, reservations represent a commitment to Microsoft to use a specific service for a set period of time. In return, Microsoft offers a significant discount on the monthly fee for the service. However, reservations are still quite flexible at this time. They can be exchanged or returned at any time, as long as a maximum amount of €50,000 for a 12-month period is not exceeded.
Reservations are suitable for services that are used consistently over a longer period and are subject to few changes. The following link provides an overview of the services for which reservations are available: What are Azure Reservations? - Microsoft Cost Management | Microsoft Learn
Accordingly, it is generally a good approach to always add three-year reservations and pay for them monthly, provided that the resource supports reservations. This way, you get the greatest possible flexibility and the lowest possible cost.
Savings plans
Savings plans are booked for a period of one or three years. Payment can be made monthly or in advance, in which case a fixed advance payment (a set amount) can be made. Once this amount is used up, the remainder is billed at the end of the month.
Like reservations, Savings Plans represent a commitment to purchase from Microsoft. However, in this case, the commitment does not pertain to the actual use of a service, but rather to committing to a specific amount of spending on the use of a service. I therefore commit to spending a certain amount per hour on the use of Azure services. In return, Microsoft grants a significant discount on the monthly fee for the services used.
Another key difference is the scope of application. While reservations must be explicitly booked for the selected size of an Azure service (e.g., DDS v5 for virtual machines), Savings Plans apply broadly based on categories. Currently, Savings Plans can be added for the Compute and Databases categories. These categories each encompass multiple Azure services, such as
- Compute: Virtual Machines, App Services, Containers
- Databases: Azure SQL Database, Azure Database for MySQL, Azure Cosmos DB
So with a savings plan, I don’t have to worry about whether it applies to a particular service, as long as it falls into one of these categories. The following article provides a complete overview: What are savings plans? - Microsoft Cost Management | Microsoft Learn.
Savings plans are suitable for scenarios in which multiple Azure services are used in parallel over an extended period, but the sizes are repeatedly adjusted due to changing requirements. In such scenarios, you don’t have to keep booking new reservations and canceling the previous ones (which would no longer be possible once the limit mentioned above is reached).
Example scenarios
The following chapters provide a few more examples of when it is necessary to purchase an Azure subscription.
Governance features for guest users
Guest users are usually a headache. Every time a user shares a file with an external contact, a guest user is created for that purpose. This guest user may only be needed once to access the file, but by default, it is not automatically removed afterward. Over time, this can lead to quite a bit of clutter, and no one is able to determine whether a guest user is actually still needed.

For this scenario, Entra ID—the central identity management platform for Azure and Microsoft 365—offers a feature called access reviews. Among other things, this feature can be used to periodically review and clean up guest users. There are various options available for who performs the review and what actions should be taken in specific cases.
However, this feature is no longer free of charge. As of January 30, 2026, such reviews—including those for guest users—are subject to a usage-based pricing model. This means that each review performed incurs a fee (see Updates and billing guidance for guest governance | Microsoft Community Hub for details).
What makes this unique is that access checks can be configured at any time, as long as at least one Entra ID P2 license is available. The verification process itself generally works without any issues. However, if actions such as automatic blocking and cleanup after 30 days are enabled, they will not function.
To use these features, you must have an Azure subscription that can be linked to Entra ID. This is the only way to bill the applicable fees for the verification. To do this, follow these steps:
- Provision an Azure subscription
- Register the Microsoft.AzureActiveDirectory resource provider in the Azure subscription
- Create a resource group within the subscription (to track usage)
- Link the subscription to Entra ID
Microsoft 365 eSignature
Microsoft 365 eSignature is a service that allows you to add digital signatures to files stored in SharePoint Online. A well-known third-party provider for this is DocuSign. Using M365 eSignature requires an Azure subscription and involves a few configuration steps. I have already explained these in detail in the following article: Electronic signatures in Microsoft 365 - without external solutions!
Developer solutions
If a company employs developers, they generally require numerous applications and environments for code development. Typically, at some point, there is a need for an environment such as Azure DevOps or GitHub for storing and further developing code, as well as for the automated deployment of applications based on that code.
These services require an Azure subscription to provide the service itself and enable usage-based billing. In addition, there are usually user-specific licenses that determine which features the user has access to or the extent to which AI can be used.
Continued use of phone-based methods for MFA
Multifactor authentication is typically required to sign in to cloud services. In addition to options such as an authenticator app or a USB security key, phone-based methods such as calls and text messages can also be used for this purpose. However, Microsoft is phasing out its own systems for providing phone-based methods. If the company continues to require phone-based methods, it will need to use a third-party provider. This requires setting up infrastructure in Azure, which in turn requires an Azure subscription.
The exact procedure for this will be announced in the coming months.
Starting an Azure subscription
Now that we have all the basics in place, the question is:
So how do I set up an Azure subscription?
As is so often the case in IT, it depends. 😉 If you think back to the chapter on subscription models, there are different ways to get an Azure subscription.
Direct purchase
Even when purchasing directly from Microsoft, there are two ways to set up an Azure subscription:
- Website: Azure - Sign up
- Azure Portal: Create a subscription - Microsoft Azure
The first option is best used if you do not yet have a Microsoft tenant (e.g., in the context of Microsoft 365). This is because selecting the wrong account for registration could result in a new tenant being created along with the Azure subscription. Therefore, the second option is safer. However, if you typically purchase your subscriptions through a partner and now want to specifically order a subscription directly from Microsoft, you’ll need to choose option 1, as this is where the necessary billing account is created.
This option is self-explanatory and will therefore not be elaborated on further here. During the process, you’ll need to provide a valid credit card. If necessary, you can initially use a personal credit card, since placing the order itself does not incur any costs. However, you should switch the subscription to a company credit card or the “payment on account” method as soon as possible.
For Option 2, proceed as follows:
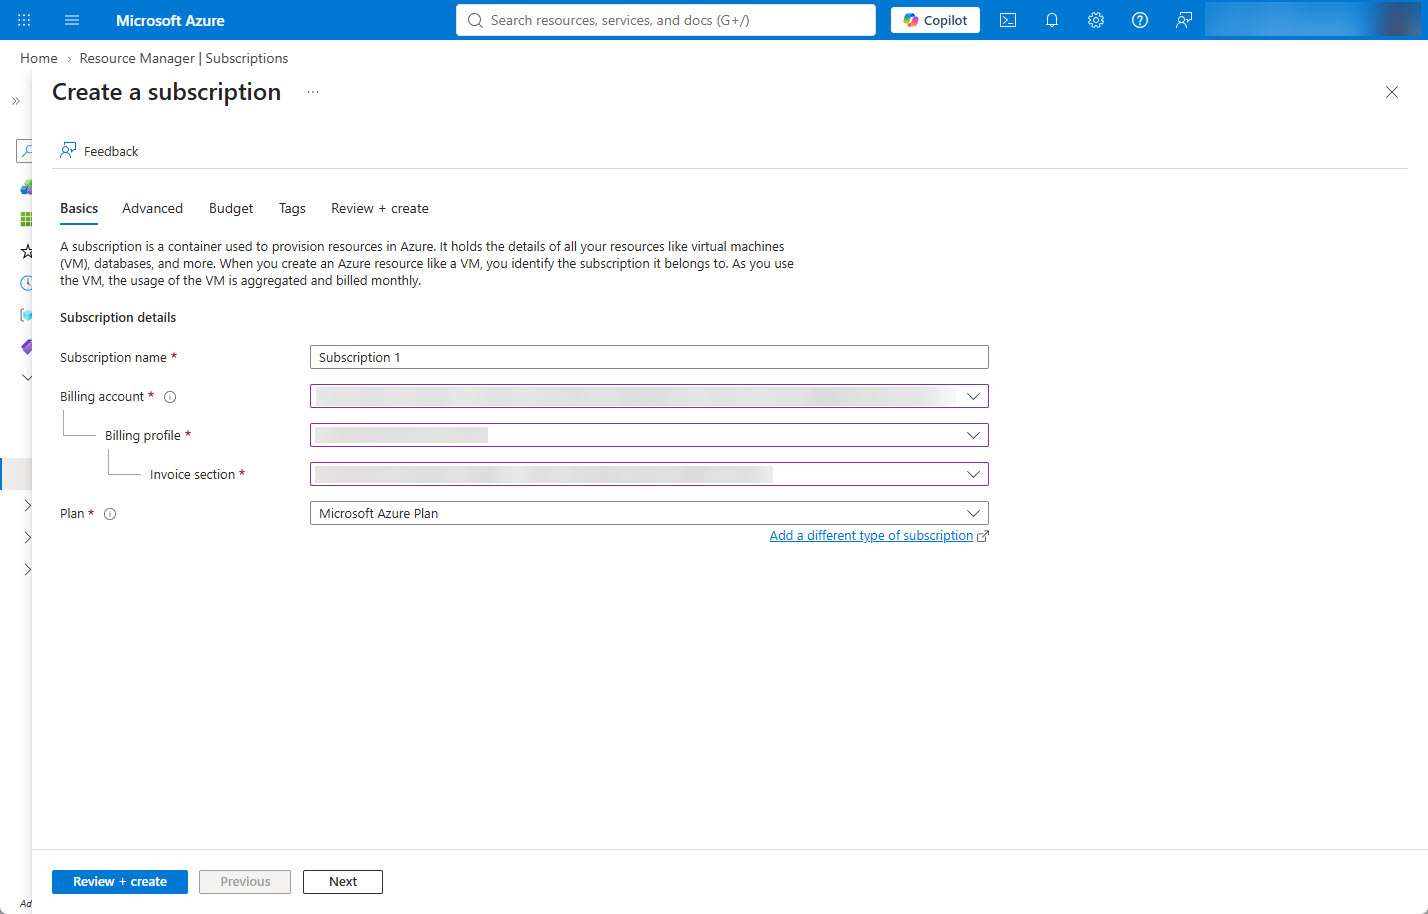
- Open the link and sign in with a global administrator account: Create a subscription - Microsoft Azure
- Enter any subscription name (this can be changed later) and select the appropriate billing options, then click Review + Create
- Create
Purchase through a partner
If you purchase your subscriptions through a partner, the easiest way is to also purchase your Azure subscription through that partner. The process for doing this is essentially the same as purchasing Microsoft 365 subscriptions. If you have end-user access to your provider’s portal, you can usually select and purchase Azure plans there as well. Again, the Azure plans themselves are free and can be added at any time.
Setting up permissions

There is a special consideration regarding permission management for Azure subscriptions. Azure uses its own role and permission model, which initially operates independently of Entra ID. Consequently, even users with the Global Administrator role do not have access permissions to an Azure plan (exception: the Azure plan is purchased directly from Microsoft and a subscription owner has been selected).
So if you find that the newly purchased subscription is not visible in the Azure portal, you must first set up permissions for it. It makes sense to create security groups in Entra ID for this purpose, which you can populate as needed in the future. For simplicity’s sake, only three groups are mentioned below. However, if you plan to use Azure on a larger scale, you should design an appropriate permissions and roles model and, ideally, secure it with Entra Privileged Identity Management (PIM).
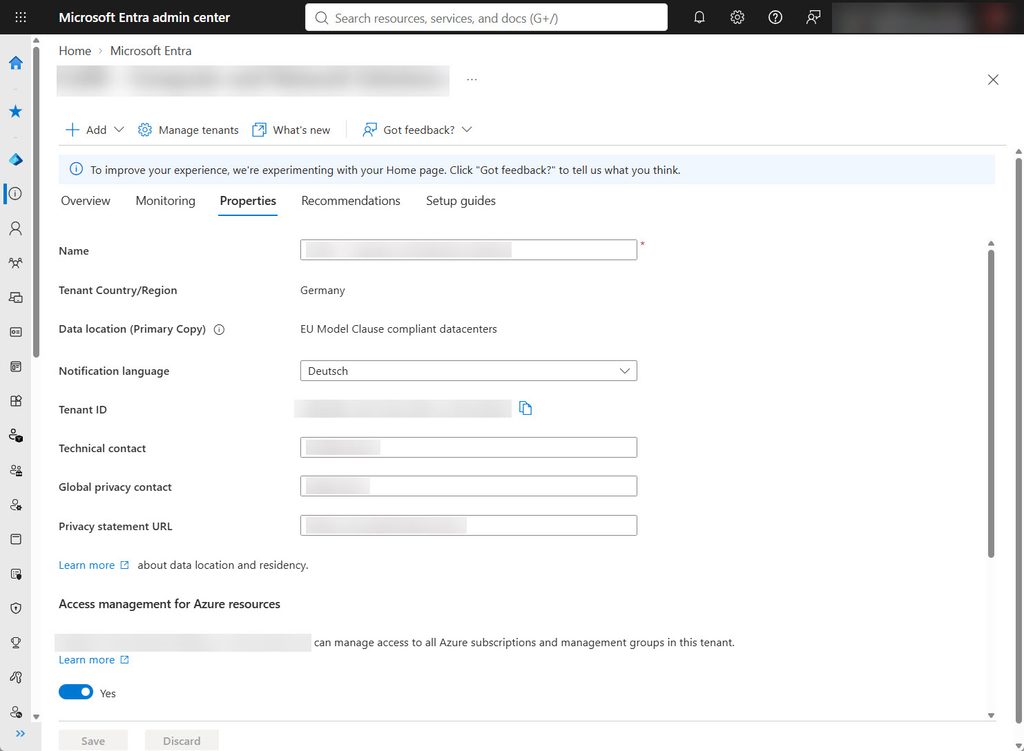
- Sign in to the Entra Admin Center with a user who has the Global Administrator role (or who can enable it using Entra PIM)
- Under Overview, open the Properties tab
- Toggle the switch <Name of administrator account> can access all Azure subscriptions...
This grants the logged-in user the User Access Administrator role at the highest level, known as the tenant root group.
You can then create the three permission groups in Entra ID. These grant the following permissions:
| Azure role | Berechtigung(en) |
|---|---|
| Reader | View resources |
| Contributor | Viewing and modifying resources, but not assigning permissions |
| Owner | Full access, including permission assignment |
The groups can then be granted permissions for the Azure subscription as follows:
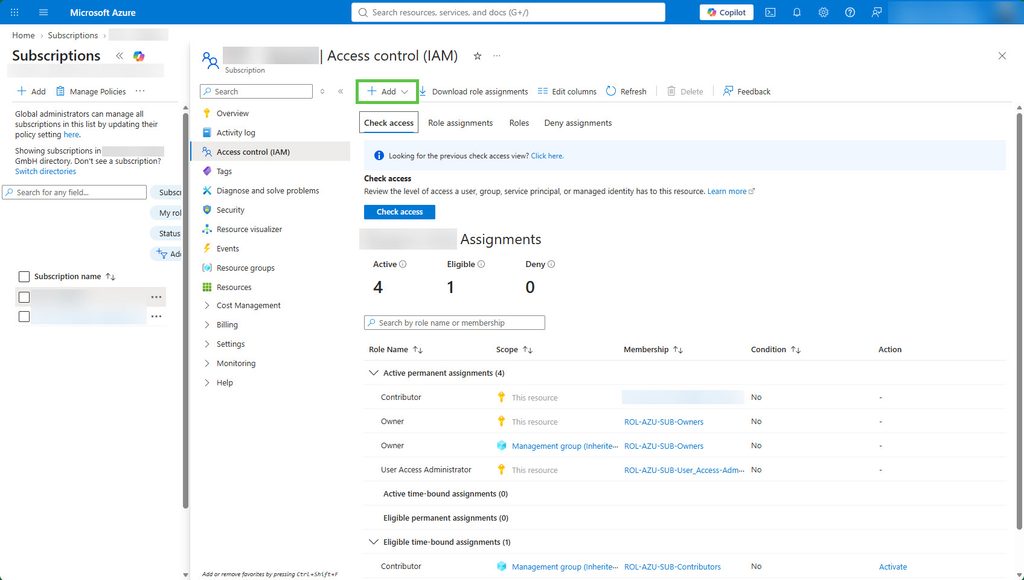
- View an overview of Azure subscriptions: Subscriptions - Microsoft Azure
- Select a new subscription
- Select Access Control (IAM) from the list
- Click + Add at the top and select Add role assignment
- Select the role you want to assign from the list and switch to Members
- Use the + Select Members function to select the group you created earlier
- When configuring the Owner role, select the option Allow users to assign all roles (...) on the Conditions tab
- On the Assignment Type tab, select Active as the assignment type
- Switch to Review and assign and confirm the assignment by clicking Review and assign
Afterward, you must disable the toggle in the Entra ID properties so that the associated permissions are not permanently enabled.
Cancel Azure subscription
If you decide that you no longer need the subscription, you can cancel it. To do so, the subscription must first be completely empty—that is, it must not contain any resources (including those that are free, such as resource groups).
You can then select the Deactivate option in the subscription overview. This sets the subscription to the “Deactivated” status. For security reasons, you must then wait 30 days before the subscription can be permanently deleted using the “Delete” option. In this regard, Azure subscriptions behave similarly to Microsoft 365 subscriptions, which are also deleted through a multi-step process.
Conclusion
To make a long story short: even if you’ve only been using Microsoft 365 services so far, there will come a time when you’ll have to deal with Azure as well. Accordingly, it makes sense to explore what Azure actually is (and what it isn’t) and when and how costs for its use may arise.
The next part of the series will cover how I can provision resources in Azure—despite it being a cloud environment—in a way that prevents just anyone from accessing them however they want.
Liked this article? Share it!